TS-E 17mm Lens Review – Part 2
In Part One of this review, we looked at the Canon TS-E 17mm f/4 L’s optical capabilities when used as a simple prime wide-angle lens. This second part is a closer look at the tilt and shift functions of the lens and what they can do to add to your photography.
Again, this is not a comprehensive ‘be-all, end-all’ review of the 17mm TS-E, but rather a quick look at some of the things that can be done with it and hopefully lead you to make a better educated decision on whether or not it fits into your arsenal. These examples of shots are just the tip of the iceberg when it comes to what you can do with this lens.
Shift
Two of the major functions of the Shift feature are to: A)- Decrease or alter perspective distortion, and B)- help with creating panoramic images.
As far as fixing perspective goes, I have always been a fan of the distortion ultra-wide angle lenses give. I often like the “looking up from below” style of composition which most wide lenses amplify. But there are times when this is not ideal, and even if you are like me and you enjoy that look, it comes with a price which is unrealistic warping that trickles down to the details. Although the examples of the 17mm TS-E in part one show less distortion in the edges than the 17-40 L, the physics of wide angle lenses will always cause this look when pointed upward from below at a large object such as a building, trees, etc…
Here is an example of the TS-E’s ability to correct perspective distortion:

This image of trees in lining the street was shot with the 17mm TSE in 'normal' mode. Notice the warped perspective. Sometimes, this is a desired effect, although not completely realistic.

This is the composition of the camera during the first exposure, seen above. (Low to the ground and the entire body is tilted upwards)

This is the composition during the second exposure with the lens shifted upward for distortion control. Notice the actual angle of the body is in a much closer line to the horizon.
You may notice in the second exposure, that when shifted, not all that was available to see in the first exposure reached the sensor. This is the price paid for using shift… One thing I find excellent about the ability to correct distortion is the small, detailed areas when fixed. This can be a great tool to have if you are shooting landscapes that will be turned into large prints. Below are crops from each shot to give you an idea of what you can achieve.
One of the greatest features of this lens – and it’s partner, the Canon 24mm TS-E L II, is their barrel’s ability to be rotated within seconds while still mounted on the camera. This means you can use vertical and/or horizontal shift (and tilt) whether you are shooting in landscape or portrait mode. This is not only great for perspective control in many situations, but also for full creative control when making exposures for stitched panoramas.
USING SHIFT FOR PANORAMAS
The TS-E makes creating a series of images to be later stitched together as a panorama very simple. Here is a quick example:
The following three exposures were all made with the same exact camera composition, mounted on a tripod. The only thing that was changed was the amount of shift applied.
(Unrelated- 😀 Unfortunately for me, the fountains at this plaza are powered sporadically and at random intervals, so there is a space missing in the fountain’s flow… Although, I kind of like the effect.)
Tilt
Using tilt effectively, is in my opinion more difficult. It involves small incremental adjustments in composition and focus. Live-View is a feature that will greatly benefit you if you are using Tilt a lot. Especially if used for an increase in depth of field.
If you are new to this idea, I recommend checking out this tutorial on utilizing the Tilt function by the Keith Cooper at Northlight Images.
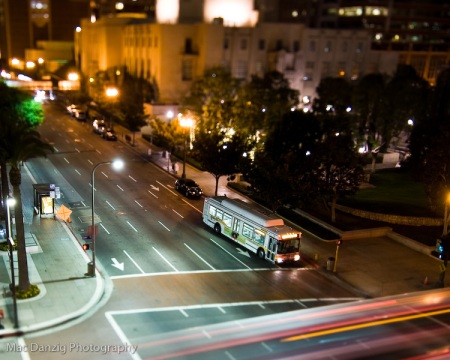
Besides using tilt to achieve a broad depth of field while maintaining a large aperture, tilt can also be used to decrease depth of field dramatically. Some people use this to get the “miniature” look which can make a large landscape appear like a small model. The effect is much more pronounced on lenses with a longer focal length, but the same can be had with the 17m TS-E, giving some pretty unique results. This is actually quite simple and below are some examples of how what you can do…
Metering
One thing you must get used to with the TS-E if you’re going to use tilt and/or shift, is using manual mode. Your camera’s TTL (through the lens) metering system is going to get confused and either over, or under-compensate the exposure. If you are shooting in a semi automatic mode like aperture priority, you’re going to end up with shots that are either too dark or too light. The best way to meter TTL is to meter with the lens in normal neutral position, then keep that exposure locked in and work around it in baby steps, depending on your results after you’ve taken the tilted and/or shifted shot…
So…
All in all, it’s a pretty sweet lens with a ton of abilities, limited only by your creativity and technical prowess. If you haven’t used a tilt-shift before, in order to take full advantage, you must spend quite a large amount of time experimenting in the field.
Although the price is hefty, I believe this is worth it to anyone who at the very least, values image quality across the frame.
If you are at all interested in the 17mm TS-E, please support the site by buying through this hyperlink.
Thanks for reading.
-Mac


November 20, 2009 at 3:33 AM
Mac – Wow. Your blog is off to a strong start, but hey – what did I expect? Always liked the pictures from your Flickr stream; clean and well thought out. Sharing all your technical know how here is one hell of a selfless thing. I have been trying to be a better photographer for 20+ years and learned something here (on the hunt for a ND -10). Would it be ok if I put a link to your blog on mine? http://andrewhyslop.blogspot.com/ – there may be an entry or two about you already buried in there somewhere. Thanks again.
November 20, 2009 at 5:26 AM
Thanks, Andrew! Yes, of course you can link to me…
Glad you found something useful on here… I’m gonna try my best to keep this a consistent blog. I have alot of content to share, I just need to write some more stuff to go with it.
Love your photos & articles as well… I’ll reciprocate.
-Mac
November 22, 2009 at 2:14 AM
Another nice, thorough review Mac. That lens looks like a blast to play with.
John
January 27, 2010 at 11:37 AM
[…] first look at the Canon TS-E 17mm F/4 L (and a test vs the 17-40 L) – Mac Danzig Photography TS-E 17mm Lens Review – Part 2 – Mac Danzig Photography […]
January 30, 2010 at 2:44 PM
[…] TS-E 17mm Lens Review – Part 2 – Mac Danzig Photography […]
February 13, 2010 at 1:02 PM
[…] 66. I got there before sunrise and made long exposures with my Canon EOS Ids Mark III and a Canon 17mm TS-e lens. This photo was an 8 second exposure which was long enough to record the misty fog and the water […]
March 6, 2011 at 12:37 PM
Thanks MAC , nice sample shot and review ,
I just had this lens few days ….. really nice and much interesting than other L lens.